Personal Data

My photo
Belgium
I dedicate this blog to my loving husband, my two beautiful children, my dearest friends & family. Thank you for always loving me and enjoying my food. You are my inspirations for any new creations I make.

More Pictures

www.flickr.com
This is a Flickr badge showing public photos and videos from Lintang Dewani. Make your own badge here.
Showing posts with label cakes. Show all posts

Friday, March 25, 2011

Bread Pudding With Apple

DSC_9214

Breadpudding... is a very simple to bake. As a change, instead of using raisins, I used apple. Well honestly, I ran out of raisins and I still had many apples need to be eaten.

The recipe is very simple, you can eat it warm or cold. It was a success when I added with a scoop of vanilla ice cream on top of pudding slices, and my guests were satisfied.

DSC_9220

Bread Pudding With Apple

Ingredients:
200 gr old bread
1/4 ltr milk
100 gr sugar powder
1 tsp cinnamon powder
1 tbsp kirsch (cherry water)
1 kg appels, sliced
50 gr butter, melted

Direction:
1. Crumble the bread, then soak in milk. Put aside.
2. Beat up the eggs, add with cinnamon powder, kirsch and sugar.
3. Pour the egg mixture on the soaked bread.
4. Add with slices of apples and melted butter.
5. Bake in pre-heated oven on 200°C for about 40 minutes.

**Remember, this is a pudding, not a cake, so you'll find it a bit soft but quite firm to stand without the mould.

Thursday, March 10, 2011

Banana Chocolate Waffles

Banana & Chocolate waffles

Woohooo... my very first foodie posting in 2011!!! I can't imagine that I've been around in blogger's world for quite a while now. My best wishes to you all who's been visiting, commenting and loving my blog(s).

I still love cooking, baking and making photo's, but there are some realities as well to be faced. We're in situation of economy crisis in Belgium,, ie. the price of gas & electricity go so high (too high), the price of gasoline is 30% up in 2 months time, and off course, not to mention the prices of (fresh)food go along with others, but the salary stays the same. Now we're trying to cut the expenses by lowing the use of electricity & car. So here I am with less cooking and baking, and also less going around with the car.
We're certain we'll pass this situation... we don't know when and how,, but we'll do our best. Stay positive & optimist!!!

Now story of baking. It's holiday for a week, time to entertain the children, especially my daughtern (6 y.o). She's a busy bee.. just like the mother.. so she needs to be kept occupied. This is then the result of our quality time, Banana Chocolate Waffles. Trust me, children love this soooo much!!!!

Banana & Chocolate waffles

Ingredients:
175 gr butter, room temperature
175 gr sugar
250 gr selfraising flour
2 eggs
1 package vanilla sugar
1 ripe banana, softened
3 tablespoons chocolate sprinkles

Directions:
1.Preheat the waffle iron.
2. In a bowl  whisk the butter, sugar & vanilla sugar together.
2. Add eggs, and whisk them until smooth.
3. Add mashed banana, flour & chocolate sprinkles, mix them together until all ingredients corporated.
4. Put two spoons waffle mixture on each section of **waffle iron, then bake for about 2 minutes, remove from the iron. Do the same with the rest of the mixture until finish.

** The waffle iron that I use.

Thursday, October 14, 2010

Celebrating Ied Fitri

From my file last month, cakes I made in the occasion of celebrating Ied Fitri with friends in Belgium.

Chocolate cake filled with mixed berries


Vanilla cake filled with butter cream

Monday, September 20, 2010

Pais Labu Kuning // Indonesian Steamed Pumpkin Cake

Steamed pumpkin cake

Still in the mood for pumpkin.... Last time I made chocolate pumpkin cinnamon cake from one pumpkin, but the pumpkin was quite big and I still had left over quite a lot. So I made another thing from it i.e. Indonesian steamed cake which is called Pais Labu Kuning. This steamed cake is kind of pudding and made from a mixture of rice flour, tapioca flour and coconut milk.

Steamed pumpkin cake

Pais Labu Kuning
Indonesian Steamed Pumpkin Cake

(source: adapted from here)

Ingredients:
200 gr pumpkin, steamed
200 gr sugar
100 gr tapioca flour
100 gr rice flour
1/2 ltr coconut milk
salt, vanilla
2-3 tbs shredded coconut
banana leafs

Directions :
1. Blend the pumpkin with sugar and coconut milk until smooth.
2. Add with tapioca flour, rice flour, a pinch of salt, vanilla and shredded coconut.
3. Prepare the heatproof bowl (square or rond shape) and cover the sides and bottom with banana leafs, pour the pumpkin mixture into it.
4. Steam for about 50 minutes. **Wrap the pan (steamer) lid with kitchen towel so that water vapor does not enter into the batter.
5. Set aside to cool, then remove from the tin. Serve with shredded cheese or steamed grated coconut.  


**Originally, in Indonesia they wrapped the mixture in banana leafs and then steam it.

Wednesday, September 15, 2010

Chocolate pumpkin cinnamon cake


I never cook or bake pumpkin before, but my neighbour is so friendly giving me pumpkin from their own garden. Here I am, a bit confused not knowing what to do with it. Thanks to Google, I find a great recipe to make this cake in combination with the pumpkin.

I have the recipe from Arcawirangun Kitchen . Since this is for the first time I bake using pumpkin, I don't change any ingredients in the recipe. But I measure all ingredients double than given on the recipe, and the mixture fills perfectly to my round baking tin (diamater 20 cm).

Chocolate pumpkin cinnamon cake

Chocolate pumpkin cinnamon cake
(source: Arcawirangun Kitchen)

Ingredients:
240 gr pumpkin, steamed and mashed
120 gr butter
6 tablespoons sweetened condensed milk
4 eggs
1 tsp emulsifier
200 gr sugar

Sift together:
120 gr flour
30 gr cocoa powder
20 gr cornstarch
1 teaspoon baking powder
1 tablespoon cinnamon powder

Directions:
1. Beat butter until white and creamy, add sweetened condensed milk and mashed pumpkin, then beat until blended, set aside. 

2. Beat eggs, sugar and emulsifier until thick. 

3. Add  sifted mixture flour into egg mixture, stirring until blended. 

4. Put in the butter and pumpkin mixture and stir well. 

5. Pour into baking pan (round, dia. 20cm) that has been greased, bake in the oven on 180 degrees for 55 minutes.

Friday, August 13, 2010

Blackberries Cinnamon Cake

DSC_7366

If others have blackberries in their bag, I have blackberries in my garden... ^_^. They can't be used to make a phone call or to send email etc but they can certainly be eaten.

Our blackberries are growing very healthy and wildly through the year. Actually the plant was almost thrown away by my hubby when he was planting other plants. With a hard resistance by me *wink.. I was able to move it somewhere else hidden between the hedge. Surprisingly this blackberry plant still grows healthy and produces quite amount of fruit.
I don't really like the fruit, so over the years I just let the fruit eaten by the wild birds. This summer my hubby is busy changing our garden and makes the birds scared to eat the blackberries, here I am with small boxes of blackberries trying to figure out how to turn this fruit into something yummy.

After browsing here and there, I finally found a recipe that fits me, easy, practical and also economical... Blackberry Cinnamon Cake.. (source: Bramen Kaneeltaart).


Here I'm sharing with you the recipe:

140 gr butter
140 gr sugar
140 gr almond powder
140 gr selfraising flour
1 egg
1 theespoon cinnamon powder
1 theespoon vanilla-essence (I use vanilla sugar)
 150 - 225 gr fresh blackberries

1. Preheat the oven to 180 º F. Line a round baking tin with baking paper of about 23 cm.
2. Beat the butter, sugar, almonds, flour, egg, the cinnamon and vanilla essence in a bowl.
3. Spoon half the mixture into the mold and spread it with a fork a little flat. Scatter the blackberries on top and divide the rest of the batter over.
4. Place the shape on the baking tray and bake the cake 1 hour, until golden brown and springy.
5. Place the cake on a rack and sprinkle with cinnamon and powdered sugar on top.

My way:
1. I used cupcake baking molds.
2. I added the almond powder after I beat the butter, sugar, almond, flour, egg, the cinamon & vanilla essence.
3. I sprinkled over the dough the cinnamon powder and vanilla sugar.
4. Then I baked them for about 25-30 minutes and I made 14 cupcakes.


Blackberry

Monday, March 22, 2010

Chocolate cuppies with butter cream

Last saturday I was invited to a party of my friend Nia. I knew she would cook plenty of food so I didn't plan to bring any food either. But I never feel good to come with empty hands, so I brought her chocolate cupcakes and garnish with light chocolate butter cream.


Chocolate Cupcakes

Ingredients:
175 ml milk
60 gr pure chocolate, fine chopped
125 gr sugar
60 gr butter, at room temperature
1/2 teaspoon vanilla essence
1 big egg, whisked
150 gr selfraising flour
2 eatspoons chocolate chips or chopped pure chocolate

1. Heat the milk in a saucepan to boiling point. Put the chocolate and one third of the sugar in a bowl, pour out the milk and stir until smooth. Let it cool.

2. Put the butter in a bowl, add the remaining sugar and vanilla. Beat the mixture light and airy with a wooden spoon and scoop the egg slowly in. Stir the chocolate mixture and flour alternately through there. Stir through the chocolate chips. Fill the paper cups two-thirds of the mixture. Bake the cakes in a preheated oven about 15-18 minutes at 180°c. Let them cool before garnishing.


Light Chocolate Butter Cream

Ingredients:
125 gr butter, at room temperature
400 gr sugar powder, sifted
3 eatspoons cocoa powder, sifted
3-4 eatspoon milk

Beat the butter in a bowl with wooden spoon or mixer until soft and creamy. Beat in the icing sugar, cocoa and milk slowly to get a thick and smooth glaze. Place the mixer when used on the lowest stand.

Variations:
- Mocca butter cream:
replace the milk with cold coffee.
- White vanilla icing: Replace the cocoa powder with 1 tsp vanilla essence
.

(Source: Chocolate by Linda Collister)

Sunday, March 21, 2010

Devil's Food Cake


I made devil's food cupcakes before, but this time I want a real cake. Eventhough I find this cake is a bit too dry, perhaps because I use whipped cream instead of sour cream. But the texture is light, has beautiful dark color and the taste is heavenly delicious. I'm not exaggeratted, but to have rich super delicious chocolate ganache, use a very good quality chocolate.

Devil's Food Cake
(source: Chocolate by Linda Collister)

Ingredients:
110 gr pure chocolate, fine chopped
125 ml sour cream (I use whipped cream)
175 gr sugar cane

300 gr flour
a pinch of salt
3 eatspoons cocoa powder
1 teaspoon baking soda

115 gr butter
200 gr sugar
2 big eggs, split
1 teaspoon vanilla essence

175 ml water, at room temperature

Ganache & filling
140 gr pure chocolate, fine chopped
140 gr milk chocolate, fine chopped
225 ml sour cream

Directions:
1. Heat the chopped chocolate, sour cream and cane sugar in a heavy bottom saucepan over low heat. Stir occasionally until the chocolate melted and mixture is smooth, but not too hot. Put the melted chocolate aside until further use

2. Sift the flour, salt, cocoa and baking soda, put aside.

3. Beat the butter until creamy with a mixer. Beat in the sugar slowly. Beat the egg yolks one by one, followed by the vanilla essence. Stir the sifted flour mixture there, interspersed with water, tablespoon by tablespoon. Use the lowest position of the mixer and mix briefly as possible.

4. Add the melted chocolate once the rest is well mixed. Pour the mixture over the mold (23 cm diameter) and bake the cakes for 50 minutes in a preheated oven at 180°c. You can also divide the mixture over two molds of 23 cm diameter, then bake the cakes for 25-30 minutes.
The cake is cooked when it springs back when gently pressed in the middle and it becomes separated from the edge.
Let it cool 10 minutes and turn it out on a rack, remove the greaseproof paper and allow to cool completely.


Ganache & filling

1. Melt the dark & milk chocolate in a fireproof bowl over a saucepan with stomed but not boiling water. Remove the bowl from the heat, stir the mixture until smooth and whisk in the cream. Let the mixture thick and spreadable.

2. Divide the cake into two or three layers, spread frosting on the cake. Place the layers on each other, then spread the top and sides of cake with the glaze. Store the cake in a cool place until you serve.

**I use microwave method (idea sources from Planet Cake) to make the ganache or melt the chocolate. It's easier and less work.

1. Put the chocolates and cream in a microwave-proof bowl and heat for 1-2 minutes on high then remove and stir. Repeat heating (if necessary) and then stirring until the ganache is smooth.

2. Remove the bowl from the microwave, cover with plastic wrap and leave for 5 minutes. Shake the bowl a little bit so all the chocolate sinks to the bottom.

3. Mix with a hande whisk until smooth, allow to cool completely.


Thursday, February 11, 2010

Little mermaid for my little girl

Today is my daughter becoming 5 years old. Her big day today, because today they also celebrate carnival party at school. What a lucky girl :o)).

Before she went to school she asked me to bake b'day cake for her, and she chose Ariel from little mermaid. I did try my best to copy Ariel from disney book. The outcome wasn't so bad since it was the first time for me to do the patchwork and I kind enjoyed it too. The most important when she got back from school, she was so happy with her cake and just couldn't wait to eat it.

On Saturday, she still has a big party and some friends from school are invited too. It's also going to be her big day, because it's going to be her first b'day party with friends at home. Oh, it feels like she's going 16th.. my goodness!

This is just a simply vanilla cake filled with whipped cream and covered with fondant. The size is just 15 cm (diameter) but it can be eaten for 6 up to 8 people.

Wednesday, February 10, 2010

Cars McQueen look-alike for Reza b'day

Reza is a son of my friend. He's turning 4 last week. He asked cupcakes for his friends at school. He likes cars a lot, especially from disney figure, lightning McQueen from Cars movie. Well, I tried my best to satisfy him.. and voila, here is the result...


I made the figures from marzipan and the checkboard from fondant. Only too bad, some cakes were dried out and flopping out from the case. It was a bit struggle to fix them, but still, two of the cupcakes couldn't be fixed. I had to be really careful when I put the decorations on them.. to cover the damage.. pfff... :(

Sunday, January 24, 2010

Farewell Party Cake

It's been a busy weekend for me. There were two farewell party invitations in one day. One was from Pipiet, a friend who is moving back to Indonesia. Her husband worked for Indonesian Embassy in Brussels en after 4 years they move back to Indonesia to be replaced somewhere else. I couldn't come to their farewell party but I decided to make a cake with the decoration for her. The dresscode of the party was purple, so for that occasion I also chose purple to cover the cake.

.....................ooOoo...........................

The other farewell party was from Diana De Caluwe. She's going on retirement as nanny. She used to take care my daughter when she was a baby. She's been doing her job for 25 years and time to stop now. Because of this Diana's farewell party I couldn't go to farewell party of Pipiet. Diana didn't know about this party, it was a surprise for her. Her daughter planned this party with other colleagues of Diana and all kids who used to be onder her care were invited.

It was a pleasant and emotional meeting after 3 years didn't see each other. Especially when she saw my daughter again, she had tears in her eyes. And my cake, I tought it would be for everybody, but no, she didn't share it with other guests but she kept it for herself.. hahaha.. which is fine for me. In fact I made it especially for her.

.......................ooOoo........................

The cake itself was a chocolate cake filled with mascarpone strawberry and covered or decorated with rolled fondant.

It was hard work to decorate two cakes for the same day. It was a bit lack of ideas, but then I just decided to go for something simple yet pretty to see.

Monday, January 18, 2010

Cream Cheese Brownies

A lazy sunday and craving for something sweet??!! Yes, this is the result.
Recipe from Joy of Baking.

Brownie Layer:

1/2 cup (113 grams) unsalted butter, cut into pieces

4 ounces (114 grams) unsweetened chocolate, coarsely chopped

1 1/4 cups (250 grams) granulated white sugar

1 teaspoon pure vanilla extract

2 large eggs

1/2 cup (70 grams) all purpose flour

1/4 teaspoon salt

Cream Cheese Layer:

8 ounces (227 grams) cream cheese, at room temperature

1/3 cup (65 grams) granulated white sugar

1 teaspoon pure vanilla extract

1 large egg

- Preheat oven to 325 degrees F (160 degrees C) and place the rack in the center of the oven. Have ready a 9 x 9 inch (23 x 23 cm) square baking pan that has been lined with aluminum foil across the bottom and up two opposite sides of the pan. Set aside.

- In a stainless steel (heatproof) bowl placed over a saucepan of simmering water, melt the butter and chocolate. Remove from heat and stir in the sugar and vanilla extract. Add the eggs, one at a time, beating well (with a wooden spoon) after each addition. Stir in the flour and salt and beat, with a wooden spoon, until the batter is smooth and glossy and comes away from the sides of the pan (about one minute). Remove 1/2 cup of the brownie batter and set aside. Place the remainder of the brownie batter evenly into the prepared pan.

- Then in the bowl of your food processor (or with a hand mixer), process the cream cheese until smooth. Add the sugar, vanilla, and egg and process until creamy and smooth. Spread the cream cheese filling over the brownie layer. Spoon small dollops of the reserved brownie batter evenly on top of the cream cheese filling. Then with a table knife or wooden skewer, swirl the two batters without mixing them.

- Bake in the preheated oven for about 25 minutes or until the brownies start to pull away from the sides of the pan and the edges of the brownies are just beginning to brown. Remove from oven and place on a wire rack to cool. Refrigerate the brownies until they are firm enough to cut into squares (at least two hours). Once chilled, remove the brownies from the pan by lifting with the ends of the foil and transfer to a cutting board. With a sharp knife, cut into 16 squares. It is a good idea to have a damp cloth nearby to wipe your knife between cuts. These brownies can be stored in the refrigerator for several days.

Makes about 16 - 2 inch squares.

Wednesday, January 13, 2010

Chocolate Banana Cake For Valentine

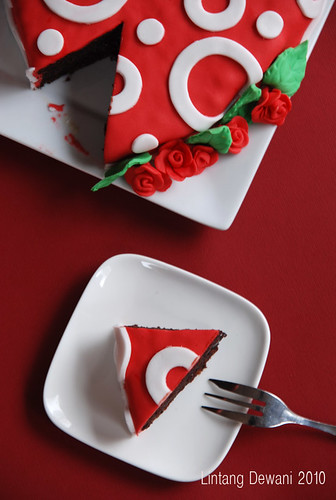
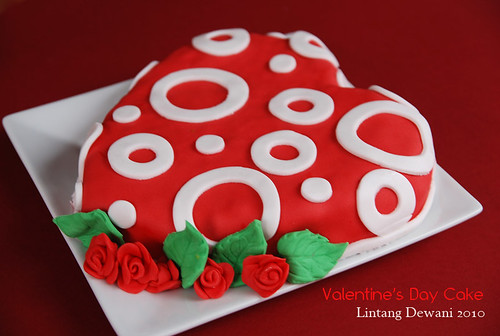
Yesterday I was so in de mood for valentine.. eventhough it's still a month to go.. but who cares, I wanted to make and decorate a cake.

I got the recipe for the chocolate banana cake from Joy Of Baking, then I decorated it in the style of retro with plastic icing or sometimes called as rolled fondant.. it looks soooo cool!!

I only used 1/2 of the recipe for a 20 cm diameter cake, then I cut the cake in the shape of a heart.

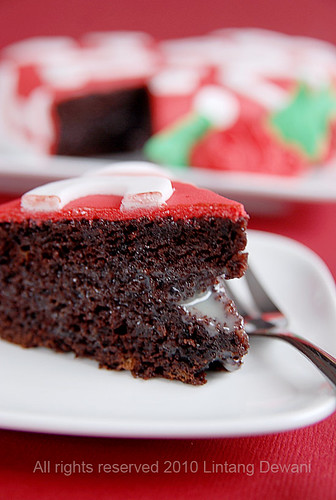
For the filling, I changed with white chocolate ganache using the same recipe.. but too bad I didn't wait long enough until the ganache cooling down, the filling was still melting and absorbed by the cake.. well it wasn't really succeed.

I just copied the original recipe... to save my time for typing it back.


Chocolate Banana Cake

2 cups (400 grams) granulated white sugar (I would reduce the sugar since the banana is really ripe, sweet & soft)

1 3/4 cups (245 grams) all-purpose flour

3/4 cup (75 grams) cocoa powder

1 1/2 teaspoons baking powder

1 1/2 teaspoons baking soda

1/2 teaspoon salt

2 large eggs

1 cup mashed ripe bananas (about 2 medium sized bananas)

1 cup (240 ml) warm water

1/2 cup (120 ml) milk

1/2 cup (120 ml) safflower or canola oil

1 1/2 teaspoons pure vanilla extract

Chocolate Ganache Frosting:

8 ounces (227 grams) semisweet or bittersweet chocolate, cut into small pieces

3/4 cup (180 ml) heavy whipping cream

1 tablespoon (14 gram) unsalted butter


Directions:
Chocolate Banana Cake: Preheat oven to 350 degrees F (180 degrees C) and place rack in the center of the oven. Butter, or spray with a non stick vegetable spray, a 9 x 13 inch (23 x 33 cm) pan. Set aside.

In a large bowl whisk together the sugar, flour, cocoa powder, baking powder, baking soda, and salt. Set aside.

In another large bowl, whisk together the eggs, mashed bananas, water, milk, oil, and vanilla extract. Add the wet ingredients to the dry ingredients and stir, or whisk, until combined. You will notice that the batter is quite thin. Pour the batter into the prepared pan and bake for about 35 to 40 minutes or until a toothpick inserted in the center of the cake comes out clean.

Remove from oven and let cool on a wire rack. When completely cooled, frost with the Ganache.

Ganache: Place the chopped chocolate in a medium sized stainless steel, or heatproof bowl. Set aside. Heat the cream and butter in a medium sized saucepan over medium heat. Bring just to a boil. Immediately pour the boiling cream over the chocolate and allow to stand for 5 minutes. Stir until smooth. When Ganache has completely cooled, beat until soft and fluffy. Then spread the frosting on top of the cake. Garnish as you like.

Thursday, December 17, 2009

Christmas Cupcakes


It's holiday season. As usual, I'm busy again behind the kitchen... well actually my daughter kept me busy. She wants me to make her cupcakes with christmas theme so she can take them to the school. Surely, for her I'll do everything.

The cake itself is very easy to make and the decorations I picked up here there from internet as inspirations. Voila, now I got some collections of christmas cupcakes. As usual I use rollfondant for the decoration.

Merry Christmas to you all and have a nice holiday!!!!

Monday, November 2, 2009

Red Velvet Cupcakes

It's been a long time I wanted to make these kind of cupcakes. Finally I had the time today to bake them. I took my time and followed the intructions really well. I really wanted to do it right.. and yaaaiiii... it worked!!! My red velvet cupcakes came out nicely and so perfect just like in my dream.

For the frosting I use the Vanilla Cream Frosting that came along with the recipe.

I made 30 cucpakes with this recipe.

Red Velvet Cupcakes
Source: De Leukste Tarten

300 g fine sugar
200 g butter (room temperature)
2 eggs
280 gr flour
40 gr cornstarch
2 tbs (30 g) cocoa
1 tsp (5 g) sodium bicarbonate
pinch salt
240 ml buttermilk (room temperature)
11/2 tbs red liquid dye
1 tsp (5 ml) vanilla essence
1 tsp (5 ml) (apple) cider vinegar

Instructions:
1. Preheat oven to 180°c. Line cupcake pans with paper liners.
2. In a medium bowl, whisk together flour, cocoa powder and salt. Set aside.
3. In a large mixing bowl, beat butter on medium speed for 30 seconds. Add sugar and vanilla; beat until combined. One at a time, add eggs; beat on medium speed after each. Bet in food coloring on low.
4. Alternately add flour mixture and buttermilk to egg mixture; beat on low-medium after each just until combined. Stir together baking soda and vinegar. Add to batter; beat just until combined.
5. Fill cupcake liners two-thirds full. Bake 18 to 20 minutes, or until toothpick inserted near centers comes out clean. Cool pans on wire racks for 10 minutes. Gently remove cupcakes from pans; cool.
6. Frost with anykind of cream frosting you like.

For the cream frosting I just made 1/2 of the recipe and enough to cover the entire cupcakes.

Vanilla Cream Frosting

45 g flour
240 ml milk
200 gr unsalted butter
200 gr caster sugar
5 ml (1 tsp) vanilla essence

1. Stir the flour and milk together in a saucepan. Let the mixture to boil for about 10-15 minutes. Keep stirring, then cover the with baking paper and let it cool down to room temperature.
2. Beat the butter until creamy and light. Slowly add the sugar and finally the vanilla.
3. Add the cooled milk mixture and keep beating for about 5 minutes on medium/high speed. Cover and keep for about 15 minutes in the refrigerator.

Monday, July 20, 2009

Mixed berry yoghurt cake

This is extremely simple recipe which will not require you to spend hours in the kitchen. This cake can be made using a variety of flavours and as final touch I like to sprinkle with raspberry coulis.

Mixed berry yoghurt cake
(source: Simply Irresistible French Desserts by Christelle Le Ru)

125 gr natural yoghurt
250 gr sugar (I used 200 gr)
1 teaspoon vanilla essence
3 eggs
1 lemon rind
230 gr flour
1 tablespoon baking powder
50 ml vegetable oil
mixed berry jam

Topping:
Fresh mixed berry
Icing sugar

As final touch I added raspbery coulis

Directions:

1. Preheat oven to 160°c. Grease a 25 cm ring tin or cupcake tins.

2. Beat the yoghurt, sugar, vanilla essence, eggs and lemon rind together in a mixing bowl.

3. Whisk in the flour, baking powder and vegetable oil and mix until well combined.

4. Pour half of the mixture into the prepared tin(s), spoon the mixed berry jam on top and cover with the remainder of the batter.

5. Bake for 35 minutes or until a fine skewer or toothpick inserted into the centre of the cake comes out clean. Leave to cool.

6. Before serving, place the cleaned mixed berries in the centre of the cake and sprinkle with icing sugar and raspberry coulis.

Monday, July 6, 2009

Another Banana Cake

I already have three different recipes of banana cakes, i.e. Simply Banana Cake, Banana Coconut Cake and Banana Marble Cake. Amazingly they all have different taste and characters and I love them all.

This new recipe of banana cake is from here. Instead of making cupcakes, I made it as big cake by measuring all the ingredients doubled. This banana cake is not really sweet since it will be topped again. I subtituted the caramel and heavy cream with honey, vanilla ice cream and whipped cream. It's really delicous... really worth it to try. The ice cream won't be seen on picture, since it's really hot here and it's melting straight away by the time I'm going to make picture.


Another Banana Cake
(source: foodie blogger StrawberrySays)

Ingredients:
1 cup brown sugar, firmly packed
12 tbsp butter, softened
4 eggs
1 cup all-purpose flour
1 cup self-rising flour
1 tsp baking soda
1 tsp allspice
1 medium mashed overripe banana
1 cup sour cream (I didn't use)
6 tbsp milk

For topping I:
1/2 cup heavy cream, whipped until thick, mix with 3 tbsps caramel sauce
grated dark chocolate
1 or 2 medium banana(s), thinly sliced
OPTIONAL: Peanut butter, chunky or smooth

For topping II:
Whipped cream
Vanilla Ice Cream
Honey


1. Pre-heat oven to 150°C.
2. Beat butter, sugar, and eggs in a blender until light and fluffy.
3. Stir in sifted dry ingredients, bananaand milk. Pour mixture in baking pan.
4. Bake for approximately 50 minutes, or until golden brown. Turn cakes onto wire rack to cool.
5. Optional to use any topping.... they're both delicious.

Monday, June 22, 2009

Mini Millefeuilles

Mille-feuilles "thousand sheets" is a pastry made of several layers of puff pastry alternating with a sweet filling, typically pastry cream, but sometimes whipped cream, or jam. It is usually glazed with icing or fondant in alternating white and brown (chocolate) strips, and combed. The name is also written as "millefeuille" and "mille feuille".(text: wikipedia)

I never try to make it myself but in fact it's very easy. I use ready-to-use puff pastry and ready-to-use vanilla custard powder. They are very difficult to be sliced so I make them in separate portions and in mini versions in the shape of stars. They look so pretty after all. I like the combination to be eaten with strawberries.

This is also my entry for Jugalbandi photo event for the month june 2009 with theme "Stacks".


Mini Millefeuilles

Ready-to-use puff pastry:
Prepare and bake the pastry according to pastry's directions in the packaging.
Put aside and let it to cool down.

Ready-to-use vanilla custard powder:
Prepare and cook thick custard according to directions in the packaging.
Put aside and let it to cool down.
Pour 1 teaspoon rhum in the custard, mix well.

Take a slice of pastry, spread the custard on top of it. Do the same for the rest of the pastry's. Arrange the cream pastry's on top of each other. Dust with icing sugar if you like it.

Tuesday, May 12, 2009

Simply Banana Cake

Banana is always been our favorite fruit and we always have it at home. What happened when I have banana's over?? No problem, sometimes I make banana fritter or banana ice cream or banana cake. These light and simple banana cake is one of our favorite recipes.


Simply Banana Cake

3 ripe bananas, mashed
100 gr butter
150 gr brown sugar
2 eggs, slightly beaten
225 gr flour
1 eatspoon baking powder


Directions:
1. Preheat the oven to 180°C. Sift the flour and baking powder, put aside.

2. Beat the butter and sugar until light and flufy.

3. Add the eggs and beat well.

4. Fold in the mashed bananas in the mixture.

5. Add the flour and baking powder in the mixture, mix well.

6. Pour in loaf pan and bake for about 50 minutes.

Tuesday, March 24, 2009

Light Tutti Frutti Cake

Light Tutti Frutti Cake

I find this recipe from book called "Gezond eten met soja" (translate: The soy for health Cookbook). Since I'm busy to reduce (or to stop) consuming red meat, I try to find proteins, fibres, minerals and vitamines by consuming more soy products. I'm not sick or turning becoming vegetarian, but what I'm trying to do for me and my family is to eat healthy as much as I can. We still eat chicken and fish, but also tofu and tempeh. I'm glad that my family doesn't have any problems with food, they eat everything I serve on table. The most important is diversifications on daily food to avoid boringness.

By the way this cake is so delicious and if it's decorated with marzipan or a icing sugar this cake will be perfect and ideal for birthday cake.

350 gr selfraising flour
1 teasp baking powder
1 teasp ** pumpkin pie spice (blend of powdered cinnamon, ginger, nutmeg, cloves and sometimes allspice)
175 gr tutti frutti
175 gr soymargarine
175 gr brown sugar
3 eggs
3 tablesps milk

Directions:
1. Pre-heat the oven to 150°c.

2. Sift the flour, baking powder and pumpkin pie spice in a bowl. Put the tutti frutti in the mixture and mix well.

3. Beat the margarine together with sugar. Add gradually eggs and blend all together. Pour the milk and stir well.

4. Add the flour mixture gradually in the margarine mixture, mix all together thoroughly. Pour the mixture in a bakingform 20cm and bake the cake for about 1-11/2 hour. Insert a knife to see wether the cake is done.

5. Leave the cake to cool in the bakingform, then remove.

**I don't know where to find pumpkin pie spices in my place, so I replace it with spekoek/speculaas spices.

Labels

Followers