Personal Data

My photo
Belgium
I dedicate this blog to my loving husband, my two beautiful children, my dearest friends & family. Thank you for always loving me and enjoying my food. You are my inspirations for any new creations I make.

More Pictures

www.flickr.com
This is a Flickr badge showing public photos and videos from Lintang Dewani. Make your own badge here.

Monday, December 21, 2009

Belgian Shrimp Croquettes // Garnalenkroketjes

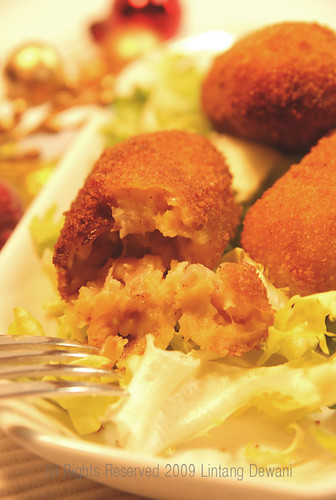
In Belgium, we call this "Garnalenkroketjes" and commonly filled with grey shrimp or North sea shrimp. They are easy to find in every fish shop or packed in the freezer at the supermarkt.

When I found the recipe I immediatelly wanted to try making it myself. But my hubby said why didn't I just buy it from the store. He said I would put myself in trouble and he wasn't so certain that the taste would be good too. But, as any other women in the world, off course I didn't listen to what he said.. so I still made it myself. When he saw the croquettes done, he wanted to taste the croquettes straight away off couse.. and the results, he put his thumbs up!!! Yaaaiiii, my first homemade Belgian shrimp croquettes were as delicious as from the package or even better. Here now I'm sharing it with you. It's very easy yet delicious.

Belgian shrimp croquettes
(Source: Smulweb)

Ingredients:
30 g butter
30 g flour
2 dl milk
1/2 dl cream
2 eggs
150 g North sea shrimp (any small shrimp will work)
pepper
1 dash of oil
breadcrumbs
frying oil

Directions:
1. Melt the butter and stir in the flour until a yellow paste.

2.
Gradually add the milk and stirring well until a thick sauce.

3. Separate the eggs. Beat the yolks and add to the sauce. Stir in the shrimp and add the pepper.

4. Spread the masses and let cool. Form the croquettes.

5. Beat the egg whites separately with a dash of oil, rolling the rolls by the breadcrumbs, egg white and then the breadcrumbs. Press well and make sure that the wraps are everywhere covered.

6. Bake in the hot frying oil until brown and crispy.

**You can add chopped parsley in the masses too if you like.

Thursday, December 17, 2009

Christmas Cupcakes


It's holiday season. As usual, I'm busy again behind the kitchen... well actually my daughter kept me busy. She wants me to make her cupcakes with christmas theme so she can take them to the school. Surely, for her I'll do everything.

The cake itself is very easy to make and the decorations I picked up here there from internet as inspirations. Voila, now I got some collections of christmas cupcakes. As usual I use rollfondant for the decoration.

Merry Christmas to you all and have a nice holiday!!!!

Wednesday, November 25, 2009

Macaroni Schotel


For autumn and winter time this dish will be repeatly served on our kitchen table. It's easy to make and children love it.

I've posted the recipe previously in my posting here, only at that time I didn't have a chance to photographed it when it was done. Now with my pleasure I'd like to show you the result of my macaroni schotel. Enjoy...!!!

Friday, November 20, 2009

Udang Masak Sereh // Lemongrass Shrimp

This is my entry for event Masak Bareng Yuuk which theme for this month is "Indonesian Food - Shrimp".

If you're googling for this recipe, you'll find many similar name. Everything is possible due to the ingredients are so simple, which is typical for asian dish, so almost everybody giving a similar name. The difference with mine is I use oyster sauce and gula jawa in the ingredients. A sweet spicy and fragrant shrimp dish for the whole family.


Lemongrass Shrimp

Ingredients:
1/2 kg shrimps, tail on, deveined
3 sticks lemongrass
1 teaspoon fresh galanga/laos
1 teaspoon coriander powder
1 clove garlic
2 shallots
2 lbs citrun leaves
1 tablespoon oystersauce
2 tablespoon citrun juice
1 tablespoon gula jawa
red chilies
leeks

Directions:
1. Cut the lemongrass, galanga, red chilies, garlic and sjallots in thin slices.
2. Heat the oil in the wok, stir fry the sjallots and garlic until fragrant.
3. Add the lemongrass, red chilies, coriander powder, galanga and citrus leaves in the wok. Stir fry until fragrant.
4. Then put in the shrimp, oystersauce, citrun juice and gula jawa, stirring until the shrimp colored.
5. Sprinkle richly with thin slices leeks and more red chilies if desired, stir all together again, ready to serve.

Monday, November 2, 2009

Red Velvet Cupcakes

It's been a long time I wanted to make these kind of cupcakes. Finally I had the time today to bake them. I took my time and followed the intructions really well. I really wanted to do it right.. and yaaaiiii... it worked!!! My red velvet cupcakes came out nicely and so perfect just like in my dream.

For the frosting I use the Vanilla Cream Frosting that came along with the recipe.

I made 30 cucpakes with this recipe.

Red Velvet Cupcakes
Source: De Leukste Tarten

300 g fine sugar
200 g butter (room temperature)
2 eggs
280 gr flour
40 gr cornstarch
2 tbs (30 g) cocoa
1 tsp (5 g) sodium bicarbonate
pinch salt
240 ml buttermilk (room temperature)
11/2 tbs red liquid dye
1 tsp (5 ml) vanilla essence
1 tsp (5 ml) (apple) cider vinegar

Instructions:
1. Preheat oven to 180°c. Line cupcake pans with paper liners.
2. In a medium bowl, whisk together flour, cocoa powder and salt. Set aside.
3. In a large mixing bowl, beat butter on medium speed for 30 seconds. Add sugar and vanilla; beat until combined. One at a time, add eggs; beat on medium speed after each. Bet in food coloring on low.
4. Alternately add flour mixture and buttermilk to egg mixture; beat on low-medium after each just until combined. Stir together baking soda and vinegar. Add to batter; beat just until combined.
5. Fill cupcake liners two-thirds full. Bake 18 to 20 minutes, or until toothpick inserted near centers comes out clean. Cool pans on wire racks for 10 minutes. Gently remove cupcakes from pans; cool.
6. Frost with anykind of cream frosting you like.

For the cream frosting I just made 1/2 of the recipe and enough to cover the entire cupcakes.

Vanilla Cream Frosting

45 g flour
240 ml milk
200 gr unsalted butter
200 gr caster sugar
5 ml (1 tsp) vanilla essence

1. Stir the flour and milk together in a saucepan. Let the mixture to boil for about 10-15 minutes. Keep stirring, then cover the with baking paper and let it cool down to room temperature.
2. Beat the butter until creamy and light. Slowly add the sugar and finally the vanilla.
3. Add the cooled milk mixture and keep beating for about 5 minutes on medium/high speed. Cover and keep for about 15 minutes in the refrigerator.

Thursday, July 23, 2009

Apple Salad

This is what they say: An Apple A Day Keeps The Doctor Away!!

The recipe of this apple salad, I found it again from an old cooking book which I bought 15 years ago. The book itself is already broken here and there, but I still can manage saving most of the recipes which make me really happy because most of the recipes are still original as my (grand)mother(s) used to cook. It's really a treasure for me.

This salad fits together very well. The sweetness comes from the honey, the freshness comes from the apples and the creamy yoghurt and whipped cream make it rich yet light and not to mention the crunchy nuts it between... so yummie and refreshing!!


Apple Salad
(source: Book "Dapur Pintar")

Ingredients:
1/2 kg apples
100 cc whipped cream
100 cc yoghurt
2 tablespoons honey
1 tablespoon lime juice
50 gr cashew nuts, roughly chopped
50 gr peanuts, roughly chopped


Directions:
1. Peel and dice apples. Marinate in salt water to keep the color stays good. Put aside.

2. In a bowl whisk the whipped cream, yoghurt, honey and lime juice together.

3. Pour the dressing over the apples and scoop everything together. Finally sprinkle with peanuts and cashew nuts.

Wednesday, July 22, 2009

Watercress Salad


It's summer time but we have more rain than sun. It's really boring for the children who are having two months holiday and not being able to play outside. Eventhough it rains a lot, the temperature is quite high, it makes me sweeting to cook. Most of the time I just cook something easy and fast which doesn't require plenty time standing in the kitchen. For lunch I make more salads and eaten with sandwich or bread. Like this watercress salad, it's a bit bitter from the watercress but at the same time it's also refreshing and juicy from the orange. Really worth it to try... I'm sure you will like it.

I'm placing the ingredients exactly like in the book, while I prefer to make it in random, just according to my own taste. Mine here is without slices of celery, chives and nuts since I'm allergic to nuts. I like to put more oranges in the salad. For the dressing I use vinaigrette from a bottle. If you have time, use the dressing recipe here, I'm sure it's much delicious.

This is my entry for Jugalbandi click photo event for the month July 2009 with the theme Bi-Colour.


Watercress Salad
(source: Book "Dinner with friends")

500 gr watercress
3 sticks white celery
1 cumcumber
3 oranges
1 red onion, slice in rings
35 gr chives
60 gr chopped pecan nuts or walnuts

Dressing:
60 ml olive oil
60 ml lime juice
2 teaspoons rasped orange skin
1 teaspoon coarse mustard
1 teaspoon honey

Directions:
Take the watercress sprigs and discard the thick stalks away. Cut the celery into strips 5 cm long. Peel the cucumber, cut it horizontally in half, remove seeds and cut it into thin slices.

Peel the oranges and remove the white, divide it into segments and remove the sheet. Put everything in the refrigerator until use.

Whisk the dressing oil, lemon juice, blood orange, mustard, honey and freshly ground black pepper together.

Put all the ingredients except the nuts in salad bowl. Pour the dressing over it and scoop everything together. Finally sprinkle the pacannoten or awalnoten on it.

Monday, July 20, 2009

Strawberries Romanoff

Strawberries Romanoff, a delectable concoction of strawberries macerated in sugar, orange liqueur and fine shreds of orange peel. The strawberries are served with sweetened whipped cream.

This dish, although typically French, has Russian origins. It was named for the royal family of Imperial Russia, at whose court French food was invariably served.

Strawberries Romanoff

1/3 c. + 2 tbsp. sugar 1/3 c. Grand Marnier or Cointreau 1 orange 3/4 c. heavy cream

1. Remove the stems from the strawberries. Rinse well and rain. pat dry with paper towels.

2. Place the strawberries in a bowl and add 1/3 cup of the sugar and the Grand Marnier.

3. Using a swivel-bladed potato peeler, cut around the orange to produce a very thin spiral of peel. Do not cut into the white pulp. Cut the peel into wafer-thin shreds. Add to the strawberries and fold together gently. (Use the orange in another dish.)

4. Cover the bowl and refrigerate until ready to serve.

5. Whip the cream and flavor it with the remaining 2 tablespoons of sugar. Serve the cream with the strawberries. 8 servings.

**Text and recipes from here.

Mixed berry yoghurt cake

This is extremely simple recipe which will not require you to spend hours in the kitchen. This cake can be made using a variety of flavours and as final touch I like to sprinkle with raspberry coulis.

Mixed berry yoghurt cake
(source: Simply Irresistible French Desserts by Christelle Le Ru)

125 gr natural yoghurt
250 gr sugar (I used 200 gr)
1 teaspoon vanilla essence
3 eggs
1 lemon rind
230 gr flour
1 tablespoon baking powder
50 ml vegetable oil
mixed berry jam

Topping:
Fresh mixed berry
Icing sugar

As final touch I added raspbery coulis

Directions:

1. Preheat oven to 160°c. Grease a 25 cm ring tin or cupcake tins.

2. Beat the yoghurt, sugar, vanilla essence, eggs and lemon rind together in a mixing bowl.

3. Whisk in the flour, baking powder and vegetable oil and mix until well combined.

4. Pour half of the mixture into the prepared tin(s), spoon the mixed berry jam on top and cover with the remainder of the batter.

5. Bake for 35 minutes or until a fine skewer or toothpick inserted into the centre of the cake comes out clean. Leave to cool.

6. Before serving, place the cleaned mixed berries in the centre of the cake and sprinkle with icing sugar and raspberry coulis.

Friday, July 10, 2009

Malaysian Fish Curry

I just realise that I haven't been posting a lot about preparing food with fish. Actually I have a very good fish curry recipe that I haven't posted here, i.e. Malaysian Fish Curry. I have eaten this fish curry few years ago on a plane flying to Jakarta. Since then I was searching to find the exact recipe but without success.

Until someday my hubby bought me "Wok Cooking Book" which has the recipe of this fish curry. When I tried to make it, it tasted exactly the same as I've eaten on that plane. You can imagine how happy and satisfied I was at that time. And since then this dish became our favorite fish dish, served with steamy rice... :p

Malaysian Fish Curry
(source: Wok Kookboek)

Ingredients:
Paste:
4 cm ginger
3 red chillies (1 teaspoon sambal ulek)
1/2 onion
2 cloves garlic
1 stick lemon grass
1 teaspoon terasi/shrimp paste (can be deleted)
2 tablespoon oil

1/2 tablespoon curry powder
125 ml coconut milk
1/2 tablespoon tamarind water
1/2 tablespoon kecap manis (dark sweet soy sauce)
125 ml water
1 teaspoon chicken broth powder
250 gr fish fillet
1 tomato
1 tablespoon lime juice


Directions:
1. Use the blender to blend the paste ingredients until smooth.

2. Stir fry the paste for about 3 minutes, then add with curry powder. Stir well.

3. Add the coconut milk, tamarind water, kecap manis, chicken broth and water in the pan. Lower the heat and continue to simmer for another 5 minutes.

4. Add in the fish, slices tomato and lime juice, continue to cook until the fish done.

Monday, July 6, 2009

Another Banana Cake

I already have three different recipes of banana cakes, i.e. Simply Banana Cake, Banana Coconut Cake and Banana Marble Cake. Amazingly they all have different taste and characters and I love them all.

This new recipe of banana cake is from here. Instead of making cupcakes, I made it as big cake by measuring all the ingredients doubled. This banana cake is not really sweet since it will be topped again. I subtituted the caramel and heavy cream with honey, vanilla ice cream and whipped cream. It's really delicous... really worth it to try. The ice cream won't be seen on picture, since it's really hot here and it's melting straight away by the time I'm going to make picture.


Another Banana Cake
(source: foodie blogger StrawberrySays)

Ingredients:
1 cup brown sugar, firmly packed
12 tbsp butter, softened
4 eggs
1 cup all-purpose flour
1 cup self-rising flour
1 tsp baking soda
1 tsp allspice
1 medium mashed overripe banana
1 cup sour cream (I didn't use)
6 tbsp milk

For topping I:
1/2 cup heavy cream, whipped until thick, mix with 3 tbsps caramel sauce
grated dark chocolate
1 or 2 medium banana(s), thinly sliced
OPTIONAL: Peanut butter, chunky or smooth

For topping II:
Whipped cream
Vanilla Ice Cream
Honey


1. Pre-heat oven to 150°C.
2. Beat butter, sugar, and eggs in a blender until light and fluffy.
3. Stir in sifted dry ingredients, bananaand milk. Pour mixture in baking pan.
4. Bake for approximately 50 minutes, or until golden brown. Turn cakes onto wire rack to cool.
5. Optional to use any topping.... they're both delicious.

Thursday, June 25, 2009

Mixed Green Salad With Smoked Salmon

When I'm trying to loose weight, salad is my best friend. It's not necessary special salad to be prepared, usually I just take all kind vegetables I find in my fridge and mix it with fruit or cheese and as final touch sprinkled with vinaigrette.

This mixed salad with salmon is one of many favorite salads I always make.

Mixed green salad with smoked salmon
a package of green salad
shredded carrot
sweet corn kernels
smoked salmon
some grapes
some dried fruit
grated cheese, if you like
vinaigrette as dressing

Monday, June 22, 2009

Mini Millefeuilles

Mille-feuilles "thousand sheets" is a pastry made of several layers of puff pastry alternating with a sweet filling, typically pastry cream, but sometimes whipped cream, or jam. It is usually glazed with icing or fondant in alternating white and brown (chocolate) strips, and combed. The name is also written as "millefeuille" and "mille feuille".(text: wikipedia)

I never try to make it myself but in fact it's very easy. I use ready-to-use puff pastry and ready-to-use vanilla custard powder. They are very difficult to be sliced so I make them in separate portions and in mini versions in the shape of stars. They look so pretty after all. I like the combination to be eaten with strawberries.

This is also my entry for Jugalbandi photo event for the month june 2009 with theme "Stacks".


Mini Millefeuilles

Ready-to-use puff pastry:
Prepare and bake the pastry according to pastry's directions in the packaging.
Put aside and let it to cool down.

Ready-to-use vanilla custard powder:
Prepare and cook thick custard according to directions in the packaging.
Put aside and let it to cool down.
Pour 1 teaspoon rhum in the custard, mix well.

Take a slice of pastry, spread the custard on top of it. Do the same for the rest of the pastry's. Arrange the cream pastry's on top of each other. Dust with icing sugar if you like it.

Friday, June 19, 2009

Quiche

Quiche again.. again... and again :-p I never get bored with this. It's easy to make, just using some leftovers, some eggs and the ready to use pastry, put it in the oven.. and done! I don't have to eat it straight away after done from the oven, usually I keep it for the day after, the day when I go to the gym. So when I'm back... quickly take a shower.. feeling fresh, tired and hungry.. voilà, there is quiche awaiting for me to be eaten, with a bit salad and few drops chilli sauce.. yummieeee!!!

Quiche

Ingredients:
Ready-to-use pastry
Steamed/blanched broccoli
Blanched leek
Leftover boiled chicken, shredded
2 eggs, lightly beaten
200 ml cream
nutmeg, salt, pepper to season
100 gr grated cheese


Directions:
1. Preheated the oven to 200°c. Prepare and bake the pastry according to pastry's directions in the packaging.

2. Mix the cream, eggs, salt & pepper in a container.

3. Scatter the vegetables, chicken and grated cheese on the bottom of the pastry case.

4. Pour the cream mixture and scatter the grated cheese on top.

5. Bake for about 15-25 minutes or until the filling solid. Remove from the oven and cool for about 5 minutes. Serve hot or cold with mix salads.

Wednesday, June 17, 2009

Nasi Goreng Oriental


Nasi goreng is always my fave cuisine. Nasi goreng can be eaten at any time of day, and many people eat nasi goreng for breakfast, often using leftovers from the previous day's dinner. The rice used to make nasi goreng is cooked ahead of time and left to cool down (so it is not soggy), which is one reason to use rice cooked from the day before.

Nasi Goreng Oriental
(source: Kumpulan Resep Sedap)

Ingredients:
2 eatspoons margarine
3 cloves garlic, chopped
1 egg, lightly beaten
50 gr shrimps
50 gr fishballs (I don't use any)
50 gr mixed vegetables (frozen)
50 gr mixed seafood (frozen)
300 gr cooked rice
1 stick spring onion
4 teaspoons fish sauce (I use oyster sauce)
1 teaspoon chicken broth powder
1/4 teaspoon salt
1/2 teaspoon pepper
1/4 teaspoon sugar


Directions:
1. Melt the margarine in the pan. Fry the garlic until fragrant. Add with egg, and stir until egg stold.

2. Add mixed vegetables, keep stirring until the vegie 1/2 cooked.

3. Put in the shrimp, fishballs and seafood, stir and mix well.

4. Put in the rice, then add fish sauce, broth powder, salt, pepper and sugar. Stir all together until cooked. Add with spring onion, stirring again, ready.

Friday, June 12, 2009

Botok Ayam // Chicken Wrapped In Banana Leaves


Botok Ayam
(source: Menu Sehari-hari Yasa Boga)

Ingredients:
2 chicken breast fillet, cut in cubes
100 ml thick coconut milk
5 salam leaves
chillies as needed
salt

Blend in food processor:
3 red chillies
2 tsp chopped laos
1 clove garlic
8 small red onions or 2 large sjallots
1 tsp chopped turmeric (I use the powder)
5 candlenuts
1 tsp chopped kencur (I eliminate this)
1 tbsp sliced lemongrass
1 tbsp sugar

Directions:
1. Fry the blended spices until fragrant with 3 eatspoons oil. Remove from the fire.

2. Mix the chicken, coconut milk, chillies, salt and spices in a bowl.

3. Take a banana leaf, give 2-3 bay leaves and the chicken spices. Wrap and steam until cooked, around 20 minutes.

Wednesday, May 27, 2009

Macaroni Schotel

I never really make this dish in purpose seeing the works I have to do to prepare all this at once. Usually when I make pasta with bolognese sauce I always have left over sauce. Or I just make the sauce a bit more. I use this bolognese sauce to make macaroni schotel. With new cooked macaroni and white sauce, I will have new dish for the whole family and afterall it's also less work in the kitchen.

The picture here was made before I put it in the oven. Once it was out of the oven, my children and hubby ate it straight away and nothing left to be photographed...!!!

Macaroni Schotel
225 gr macaroni

Bolognese sauce:
300 gr minced
1 onion, roughly chopped
400 gr (1 can) diced tomatoes
70 gr (1 can) tomato paste
1 cube broth
salt & pepper

Bechamel sauce:
50 gr butter
50 gr flour
1/2 ltr milk
50 gr grated cheese
salt, pepper, nutmeg

Directions:
1. Boil the macaroni with salt al dente and drain well, put aside.

2. Make the bolognese sauce:
- Bake the chopped onion until transparent, then add the meat in and occasional stirring. Cook until the meat brown and the liquid is gone.
- Add the diced tomatoes and broth in. Season with salt and pepper. Let it boiled until the tomatoes become soft.
- Add the tomato paste in the sauce, stir well. Lower the heat, cook until the sauce thickened.

3. To make the white sauce (bechamel sauce):
- Bake the butter to melt in a sauce pan.
- Add the flour in the melted butter, keep stiring until the flour absorbing all the butter.
- Pour milk gradually while you're whisking the roux. Keep whisking until the sauce is thick.
- Add the grated cheese in the sauce, season with nutmeg, salt and pepper to suit.

4. Pour the macaroni gently in the white sauce mixture.

5. Put all this into a large oven dish, pour the rest of the bolognese sauce on, sprinkle with grated cheese and bake for about 20 minutes at 180°C.

Crunchy Coffee Cookies

Cookies are very popular everywhere. All cookies can be combined with all kinds of flavours and tastes. As a coffee lover, I want to try to create cookies with sense of coffee. The result is very satisfactory, they are very crunchy, not too sweet and have strong coffee flavour in it. They are truly only for coffee lovers. When a friend of mine came to my house, I served her these cookies, and she was very pleased and liked them.... and she took some for home.. ^_^

This is also my entry for Jugalbandy Click Photo Event for the month May 2009.

Crunchy Coffee Cookies


Ingredients:
100 gr butter / margarine
50 gr icing sugar
1 yellow eggs
1 eatspoon instant coffee
25 gr almond powder
100 gr flour


Directions:

1. Preheat oven to 175°C. Grease cookie sheets.

2. In a medium bowl, cream together the butter, sugar and coffee. Beat in the egg, flour, and almond powder. Mix until well blended. Make figures as you like using cookies cutters or decorating tubes.

3. Bake for 10 to 12 minutes in the preheated oven, or until edges are golden. Let cool on wire racks.

Tuesday, May 19, 2009

Bubur Ayam // Chicken Porridge

Bubur is a favourite breakfast food, and many food vendors pass through the streets at dawn to serve it at residences, while calling "bubur". A popular version is "bubur ayam", which is porridge with chicken meat. In contrast to many other Indonesian dishes, it is not spicy.


I just found out from wikipedia that bubur is also called "congee".... well, I never knew it before..

Bubur can be made in a pot or in a rice cooker. Some rice cookers even have a "congee/bubur/porridge" setting, allowing the user to cook their breakfast congee overnight.

Besides functioning as an everyday meal, porridge is considered to be food therapy for the unwell. Ingredients can be determined by their supposed therapeutic value as well as flavor.

More information about congee/bubur/porridge please click here.

Bubur Ayam // Chicken Porridge
(source: Kumpulan Resep Sedap Khusus Pemula)

Ingredients:
200 gr rice
2 eatspoons sesame oil
1/2 chicken
1 eatspoon salt
2 litres water

Complements:
Cakwe, slicely cut
spring onions, finely chopped
celery, finely chopped
kecap asin (salty dark soy sauce)


Directions:

1. Wash rice until clean, enter in the pot. Add sesame oil, mix thoroughly.

2. Enter the chicken, salt and water. Let them boiling and stirring occasionally.

3. Remove the chicken from the pot, then fried and afterwards shredded in small pieces. Put aside.

4. Stir the porridge again and cook again until the porridge becomes thick.

5. Pour the porridge in the bowl, sprinkle with the complements and shredded chicken.

Tuesday, May 12, 2009

Simply Banana Cake

Banana is always been our favorite fruit and we always have it at home. What happened when I have banana's over?? No problem, sometimes I make banana fritter or banana ice cream or banana cake. These light and simple banana cake is one of our favorite recipes.


Simply Banana Cake

3 ripe bananas, mashed
100 gr butter
150 gr brown sugar
2 eggs, slightly beaten
225 gr flour
1 eatspoon baking powder


Directions:
1. Preheat the oven to 180°C. Sift the flour and baking powder, put aside.

2. Beat the butter and sugar until light and flufy.

3. Add the eggs and beat well.

4. Fold in the mashed bananas in the mixture.

5. Add the flour and baking powder in the mixture, mix well.

6. Pour in loaf pan and bake for about 50 minutes.

Labels

Followers