Personal Data

My photo
Belgium
I dedicate this blog to my loving husband, my two beautiful children, my dearest friends & family. Thank you for always loving me and enjoying my food. You are my inspirations for any new creations I make.

More Pictures

www.flickr.com
This is a Flickr badge showing public photos and videos from Lintang Dewani. Make your own badge here.

Sunday, June 22, 2008

Salami

Salami is cured sausage, fermented and air-dried. Salami may refer specifically to a class of salumi (the Italian tradition of cured meats), where an individual sausage or style of sausage (e.g. Genoa) would be referred to with the singular Italian form salame. Alternatively, in general English usage, salami may be singular or plural and refer to a generic style or to various specific regional styles from Italy or elsewhere, such as France, Germany, or Hungary. The name comes from the Latin/Italian root sal-, meaning 'salt'.

Historically, salami has been popular amongst Italian peasants because it can be stored at room temperature for periods of up to a year, supplementing a possibly meager or inconstant supply of fresh meat.

A traditional salame (singular), with its typical marbled appearance, is made from one or more of the following meats:

  • pork, chopped beef, venison, poultry, goose, lamb, goat.

Additional ingredients include:

  • minced fat
  • wine
  • salt
  • various herbs and spices

The raw meat mixture is usually allowed to ferment for a day and then the mixture is either stuffed into an edible natural or non-edible artificial casing and hung to cure. The casings are often treated with an edible mold (Penicillium) culture as well. The mold is desired as it imparts flavor and prevents spoilage during the curing process. Most salami have the mold or the casing removed before being sold in international markets. Purists insist that the mold should be left intact.

More modern (but still traditional) mixtures include additional ingredients to assist in the fermentation process. These ingredients aim to take the guesswork out of traditional curing and can be found in many of the finest salami varieties in the world, although some producers eschew the nitrates and nitrites due to health concerns.

  • nonfat dry milk
  • dextrose
  • lactic acid bacteria starter culture
  • ascorbic acid
  • sodium nitrite
  • sodium nitrate
Varieties of salami
Salami varieties include this smoked Westphalian salami with added Camembert cheese.

Varieties of salami include:

  • salami - a soft, cooked salami with the same taste look and feel to Bologna.
  • Genoa
  • Fegatelli
  • Finocchiona
  • Pepperoni
  • Sopressata
  • Saucisson sec (French "dry sausage")

Texts adapted from Wikipedia.

Friday, June 13, 2008

Devil's Food Cupcakes

I'm not surprised these cupcakes got that special name. They are really evils. The texture of the cake is incredible moist and the combination with the chocolate ganache is just heaven. These cupcakes are going to be my favorite and I certainly will make these again.

I made these cupcakes for my friend. She's just moved out and celebrating her new house today. But no worry, I made more than enough, so I would still be possible enjoying these cupcakes tomorrow by myself...hhmmmm..

Ingredients:
½ cup boiling water
6 Tbsp. unsweetened cocoa powder
¼ cup milk
½ tsp. vanilla extract

1 cup flour
½ + 1/8 tsp. baking soda
¼ tsp. salt

½ cup butter, softened
10 Tbsp. brown sugar
6 Tbsp. sugar
2 eggs

Directions:
In a bowl, whisk boiling water into cocoa until smooth. Add in milk and vanilla; set aside.

Preheat oven to 350F. Line 12 muffin cups with paper liners.

In a small bowl, sift flour, baking soda, and salt; set aside.

In a mixing bowl, beat together butter and sugars until light and fluffy. Add eggs, one at a time, beating well after each addition. Add flour mixture in batches, alternating with cocoa mixture; beginning and ending with the flour. Fill liners about halfway full.

Bake at 350F for 18-20 minutes. Cool on wire rack.

Chocolate Ganache:
½ cup heavy cream
8 oz. semi-sweet chocolate chunks
2 Tbsp. light corn syrup

Heat the cream until boiling, then pour over chocolate, stirring to melt, adding the corn syrup. Dip each cupcake into ganache upside down to get a good coating on it.

Thursday, June 12, 2008

Banana Muffin

My family loves bananas. I always keep bananas at home but most of the time I have to throw them away because they're not good anymore. This time I don't want to throw them away and I have to figure out what I'm gonna make. Well, I never make banana muffin before, seems to be my opportunity to try it.
Ingredients:
1/3 cup oil
3/4 cup brown sugar
2 eggs, beaten
1 tsp vanilla
1 tsp baking soda
pinch salt
1/2 cup milk
1 1/2 cups flour
4 ripe banana, mashed

Directions:
1. Preheat oven to 180°C.
2. Grease a 12 cup capacity muffin tin or use paper liners.
3. With a wooden spoon, mix all ingredients in large mixing bowl. Add mashed bananas at the end.
4. Pour mixture into a prepared muffin tin. Bake for 25 minutes. Cool on a rack.

*Cook's note: To check to see if the muffins are done; with a toothpick insert into the center of a muffin, if it comes out clean, it's done.

Wednesday, June 11, 2008

Fish Stew


This quick, economical and satisfying fish dish will please any fish lover for lunch or a light supper. We consume this dish usually in winter or when it's cold and rainy. This time I didn't use parsley but replaced it with chopped celery.

Ingredients:
6 tbsps olive oil
2 large onions, sliced
120 grams mushrooms, sliced
450 grams canned tomatoes
pinch dried thyme
pinch salt and pepper
430 ml water
900 grams white fish fillets, skinned
140 ml white wine (can be deleted)
2 tbsps chopped parsley
Directions:
1. Heat the oil and add onions. Cook until beginning to look translucent.
2. Add the mushrooms and tomatoes and bring to boil.
3. Add thyme, salt, pepper and water, simmer for about 30 minutes.
4. Add the fish and wine (is using) and cook until the fish flakes easily, about 15 minutes. Stir in parsely.
5. Serve with a piece of toasted French bread.

Recipe adapted from Fish & Seafood Cooking book.

Saturday, June 7, 2008

Banana Fritters

Banana fritters are the most common snacsk eaten by Indonesian people. The most common and cheap fruit in Indonesia is the banana (pisang). There is a wide variety of bananas, from the tiny, sweet pisang mas to the large pisang tanduk or plantain used for making banana fritters (pisang goreng). Pisang kepok and pisang raja are also good for making banana fritters, pisang susu is a kind of small starchy banana with light yellow skin and pisang Ambon is the kind of banana that is most commonly eaten in western countries. Just peel and eat! Believe it or not, pisang raja serai is good eaten with a slice of cheese! (Information about banana adapted from here). Banana fritters can be easily made at home but also easily find on the street and ready to eat in Indonesia.

I always use unripe pisang ambon when I make banana fritters. The texture is a bit softer but the taste is even good as if you use pisang raja or pisang tanduk.

Ingredients:
5 bananas
200 grams selfraising flour
3 dl water
2 eggs
pinch of salt
25 grams sugar
vanilla powder
oil for frying
Directions:
1. In a large bowl, combine flour, sugar and vanilla powder. Make a well in the center, and pour in water and egg. Mix until smooth. Fold in banana slices until evenly coated.

2. Heat oil in a wok or deep-fryer to 375 degrees F (190 degrees C).

3. Drop banana mixture by tablespoon into hot oil. Fry until golden brown and crispy, 10 to 15 minutes. Remove bananas from oil, and drain on paper towels. Serve hot.

Tuesday, June 3, 2008

Click Photo Event: A basket of waffles

Jugalbandi Click Photo Event for June is a special edition in honour of Briana "Bri" Brownlow who is now fighting against breastcancer. More informations about this special edition please click here.

The theme is Yellow which is the happiest colour in the spectrum. It signifies hope and enlightenment. Though the work of the LiveStrong Foundation, it has also come to signify the fight against cancer.

My entry for this event, A basket of waffles. This is my symbolic sympathy for Bri who's really brave to fight hard against her sickness. By looking at this picture hopefully she would feel better and I'm praying that she will get better soon.

Camera type Nikon D70, macro lens

Monday, June 2, 2008

Strawberry Sorbet

This strawberry sorbet has light and refreshing taste and soft yet slightly grainy consistency. The water and sugar are combined to make a sugar syrup, which is chilled, and then added to pureed fruit. To save time you may want to make a large batch of sugar syrup and keep it on hand in the refrigerator. Either fresh or frozen strawberries can be used in this sorbet.

2/3 cup (160 ml) water
2/3 cup (135 grams) granulated white sugar
5 cups or 2 pounds (1 kg) fresh or frozen unsweetened strawberries
2 tablespoons lemon juice
2 tablespoons Grand Marnier or other liqueur(optional)

1. Place the sugar and water in a small saucepan, over low heat, and stir until the sugar is completely dissolved (about 3-5 minutes). Boil the mixture for one minute then remove from heat. Pour the sugar syrup into a heatproof container, and place in the refrigerator until completely chilled (about an hour or so).

2. Meanwhile, thaw the strawberries and then place the thawed strawberries in a food processor and process until the strawberries are pureed. Transfer to a large bowl, add the lemon juice and liqueur (if using), and refrigerate until the mixture is thoroughly chilled. (If using fresh strawberries, puree the berries in the food processor, transfer to a large bowl, add the lemon juice and liqueur (if using), and place in the refrigerator until chilled.)

3. Once the simple syrup and pureed strawberries are completely chilled, combine the simple syrup with the pureed strawberries. Pour the mixture into a 8 inch (20 cm) or 9 inch (23 cm) stainless steel pan (sorbets will freeze faster in stainless steel), cover with plastic wrap, and place in the freezer. When the sorbet is completely frozen (3 to 4 hours), remove from freezer and let stand at room temperature until partially thawed. Transfer the partially thawed sorbet to the food processor, and process to break up the large ice crystals that have formed on the sorbet. (This step is what gives the sorbet its wonderful fluffy texture.) Place the sorbet back into the pan and refreeze for at least three hours, and up to several days.

Note: If you taste the sorbet after freezing and find the amount of sugar is not right, adjust the level of sugar by adding a little sugar syrup (too little sugar in sorbet) or water (too much sugar in sorbet) and then refreeze the sorbet. The sorbet is not affected by thawing and refreezing.

Recipe adapted from: Joy of baking.com

Sunday, June 1, 2008

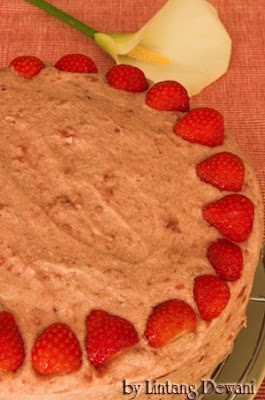
Strawberry Tart


Now is strawberry season here. The city where I live has their own strawberry productions. During the season, along the streets you can find the stands that sell fresh strawberries. The price is a bit more expensive than from the supermarkt, but the taste is really sweet and the size is also bigger. Really nice to see it. Every year in the month of May, it'll be held an election of Princess Strawberry (Aardbeien Princess). During that election it'll be also shown up the best and the biggest strawberries in the neighbourhood.

Since I have too much strawberries at home and nothing to do today because the weather is really bad, so I tried to make this strawberry tart. To make the cake itself was not really a problem, but to make the filling was a bit tricky. But after I followed steps by steps all the instructions, it worked well.

Ingredients:
For cake:
4 eggs
2 eatspoons hot water
150 gr sugar
1 package vanilla sugar
100 gr flour
100 gr maizena
2 teaspoons baking powder

Filling:
1 package (12gr) + 2 full teaspoons gelatine powder(*for Indonesia can be changed with agar-agar powder, I guess)
5 eatspoons cold water
5 dl blended strawberry (from 500 gr strawberry)
1-2 eatspoons lemon juice
100 gr sugar
6 dl whipped cream
strawberry for decoration
Directions:
Cake:
1. Whisk eggs and water for about 1 minute, then add sugar gradually, then whisk again for about 2 minutes.
2. Mix flour, maizena and baking powder together. Sift this mixed flour into eggs batter gradually by using the lowest speed.
3. Pour the batter into cake form (diam. 28 cm).
4. Bake for about 30 minutes and heat 180°C.
5. After baked, remove the cake straight away from the form and put on the wire rack. Let it cool, then divide into 2 or 3 bottoms. After cooling you can sprinkle with 8 eatspoons strawberry liqeur.

Filling:
1. Heat gelatine powder and water. Stir slowly until gelatine dissolved.
2. Mix blended-strawberry, lemon juice and sugar. Add into hot gelatine mixed and let it boil together. Put aside to let it cool.
3. After the gelatine mixed starting becoming harder, whisk the whipped cream and then mix it slowly into gelatine mixed.
4. Spread this mix as filling, the top and the side of the cake. Add fresh strawberries as decoration. Let it cool in the fridge before serving.

Truffle Tart


If you're chocolate lovers, you must try this one. This truffle tart is extremely rich, the mixture is so moist and the sweetness is just melted in your tongue. What I want to say here..... this is fingerlicking good and I guarantee this truffle tart will help you coming out from your stress.

The original recipe as written here is for 16 slices. Mine was made from 2/3 of the cake ingredients and I used cake form with diam. 22 cm. I could divide it into 3 layers and the cake was enough for 8 big slices. But for the filling and chocolate icing, it remained the same measurements as written here.

For the cake:
4 eggs
4 eatspoons hot water
175 gr sugar
1 pack vanilla sugar
100 gr flour
100 gr maizena
30 gr cacao powder
3 teaspoons baking powder

For the filling:
125 gr butter
150 gr sugar powder
100 gr cacao powder
1 egg
1-2 eatspoon(s) rhum
2 eatspoons water
1 pack vanilla sugar

Chocolate icing:
100 gr chocolate
cocosmilk/cream as needed (I used 6-7 teaspoons cocosmilk)
75 gr chocolate sprinkles
Directions:
Cake:
1. Whisk eggs & hot water with highest speed for 1 minute.
2. Gradually add sugar & vanilla sugar and whisk again for about 2 minutes.
3. Mix flour, maizena, cacao powder & baking powder.
4. Sift 1/2 of flour mix gradually into eggs mixture using the lowest speed. Do the same way with the other 1/2 flour mix.
5. Grease the cake form (dia.28 cm) and lay greaseproof paper on the bottom of the form.
6. Pour the cake mixture in the form and bake for 30 minutes on 180°C.
7. Straight after baking, remove from the form and reverse the cake on wire rack. Remove the greasproof paper too. Let it cool and then divide into 2-3 layers. Set aside.

Filling:
1. Stir butter gently.
2. Mix sugar powder with cacao powder. Sift gradually in the butter. Stir gently.
3. Add egg and rhum, keep stirring and mix thoroughly.
4. Take 16 teaspoons mixture to make 16 "size of cherries" balls. Put aside in the fridge.
5. The rest of the mixture add with water & vanilla sugar. Stir thoroughly.
6. Cover the cake layers with this mixture.

Chocolate Icing:
1. Break the chocolate in pieces.
2. Au bain-marie on a low fire stir the chocolate to become soft.
3. Add the cocosmilk or cream in.
4. Cover the top and the side of the cake with this icing.
5. Sprinkle the side of the cake with chocolate sprinkles. Keep it in the fridge before serving.

Simple Chicken Curry

Back to old days when I couldn't cook very well. At that time I always copied easy and simple recipes for daily cooking. Amongst other is this chicken curry. I don't remember anymore where did I get this recipe because I found this recipe again in my old note book which is my biggest treasure at home after my children. Simple recipe like this one is never ended, if you run out of ideas or lazy to cook, just take a simple way like cooking this simple chicken curry.

Ingredients:
1 boneless chicken
100 gr potatoes
100 gr bean sprout
100 gr carrots
1 onion (3 small red onions)
1 bay leaf (salam leaf)
1/2 - 1 eatsps curry powder
1/2 cup cocomilk
salt, pepper as needed
red chillies or sambal ulek from the jar as needed (as additive if you like more spicy and the curry becomes red)Directions:
- Cut the chicken in small pieces.
- Stir fry onions, add with salam leaf and chillies (sambal).
- Add in chicken, stir the chicken until colored.
- Add the vegetables. Season with salt & pepper. Add water as needed and let it cook until 1/2 done.
- Add the curry powder, stir thoroughly.
- When the curry fragrant starting overwhelm the whole kitchen, pour in the cocomilk. Cook until done.
- Serve with rice.

Labels

Followers